No lick and stick here!!
The common method for installing stone veneer of the artificial type is quick and enforced by the lowest bid. The formula has no apparent reprimand and no skill is required except speed. Therefore the art of the stone mason from the past is lost. The odd thing about the whole thing is the majority of the public don't know what a good job is.
If you want your fireplace or home done properly call us. You can expect!!!!
1. All joints will be filled with mortar and pressed in.
2. Up to three passes with the refractor trowel (special sculpture tool).
3. All joints tooled at the proper time, not to wet and not to dry, insuring a mess free finish.
4. All joints are swept clean of all residue and mortar particles.
5. Each stone is precise placed to insure tight joints.
6. Stones are commonly chipped to fit, stones are placed in such a way to hide the broken edges.
7. No excessive drool of mortar running over the stonework.
8. The mason's hands are kept clean and dry all the time therefore the stones are kept clean and dried.
9. Cleanup of all the stonework with the damp cloth to get rid of the dust.
10. Muriatic acid is NOT used in the cleanup or at any time. It is not necessary as our work is kept clean.
11. Complete cleanup of the site when finished.
12. Colour patterns to be arranged in such a way that the pattern is broken up.
13. Stone pattern to arranged in such a way to not to create rows or tiers.
14. Guaranteed for life.
15. The people you see on the web site are the ones that will be installing your stone.
Visit us at the job site. " We put our work where our mouth is."
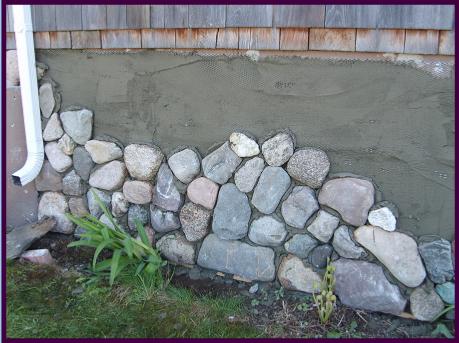
Cut River Rock is a genuine real stone veneer enhancing the beauty whether it is a river rock stone home, stone gates, stone fireplace or just a trim in the front of your home. Cut River Rock stone veneer has the advantage of showing the beauty of river rock by the way it is cut, enabling the mason to lay this stone tipping it in an angle to show the beauty. Cut River Rock stone veneer can be laid in several different ways. The most popular was is in the staggered fashion so the stone veneer will have the pleasing effect. but everyone is different , some people like our Cut River Rock stone veneer stacked while others want a River Rock appearance that being, the Cut River Rock stone veneer is laid with sunk in joints making a rocky look, and still others like the tile effect. This is accomplished by setting all the Cut River Rock stone veneer in the mortar so all the stone veneer is as level as possible.
I recommend that you use a test sheet to start a 2ft x2ft plywood panel will be fine. Once jointed you can salvage the stones if you don't completely let them set up.
A. Put your vapor barrier on your wall or project it can be tyvac or tar paper etc. Staple it on flat and wrinkle free.
B. Next comes the wire metal lathe. This has to be put on properly. Use 2 ½" galvanized roofing nails or screws 2" with large head so as to grasp the metal lathe. I like to use the 2 ½" galvanized roof nails because when I pound them in I can angle the nail in such a way as to pull the metal lathe taught as I pound it in and sort of straighten it as I pound, thereby pulling tension on the metal lathe. The metal lathe should be nailed every 8" vertical through the wall into the studs which are usually 16" apart. Any sags or bulges can be eliminated by starting on one side and pulling with angle nailing method as mentioned above. If there is any bulges or sags they must be taken out a large staple gun will work if not additional nails or screws.
C. You are ready for the scratch coat now. The important thing is the mortar which is the same for the scratch coat as the stone application mortar. The mortar is a mixture of masonry sand, type S masonry cement, and water. The Ratio is 2 parts masonry sand and 1 part type S masonry cement, and water until you have the consistency of say mayonnaise, Ketchup is to runny and peanut butter is to stiff.
It is critical to measure accurately your mix because if you don't you will have different shades or color joints and you don't want that. The sand must be clean not muddy you can buy masonry sand at your local masonry supply dealer and that is just fine. If you use pit run you will have to screen it through 1/16th" screen mesh.
D. Now you are ready to lay stone you have enough scratch coat on only what you plan of installing that day. Again use same consistency of mortar as scratch coat if the mortar stiffens up a bit add a little water to bring it back. To mix your mortar you don't need a elaborated mixer all you need is a good paint mixer attachment on a variable speed ½ " electric drill in a 5 gallon pail works fine.
First you will have to have a base to start on depending on the situation you can use the floor or if outside a 2x4 nailed at the bottom or to the concrete wall or if there is a starter ledge build into the concrete wall so much the better. I have used a 2 x 4 just laying on the mud but you have to be awful careful you don't move it until it is set up.
Lets get started. First put your corners on up two or three stones on each corner you put an ½ inch or so of mortar on the stone and press it in and make sure it sets firm on the bottom, next one in the obvious place again press and wiggle it in and seat it on the stone below or starter strip continue to pile on the stone in their obvious places to make things quick and easy lay out lots of stones. Dozens of them so you have a good choice and have a hammer handy and don't be afraid to use it. If the stone doesn't quite fit, give it a crack with the hammer and knock off a small piece.
As you apply the stones and push them in for a tight fit there will be mortar ooze out of the joints DON'T TOUCH IT whatever you do because if you do you will make a big mess all over the stones.
Depending on the heat of the day and the drying time it could be 1 hour or so in the heat of summer and 4 hours in the cool fall before it is ready to joint.
THE TEST, IS WHEN THE MORTAR BETWEEN THE JOINTS TAKE ON A CRUSTY APPEARANCE AND SHEEN, IT''S READY TO JOINT. WHEN THE MORTAR IS THE CONSISTENCY OF MOIST FUDGE.(not the hard crumbly kind).
E. With your refractor trowel or willow leaf trowel you knock off the excess lumps of mortar (now that the mortar is part dry it doesn't make a mess like it would have when it was first put on). Push the mortar in to the joint as you slide the jointer along, there should be small curls of mortar along the edge of your trowel tracks that's okay leave it for now, go over all the joints you have done to this point quickly and grout (fill in) in any spaces that don't have enough mortar. At this point you can us a grout bag which is like a giant cake decorator bag and fill in the joints or you can grout in the joint with small wedges of mortar that you have taken from the joints that have to much.
Back to the grout bag, in order for the mortar to squeeze out of the bag it has to be the consistency of mayonnaise. Now being that your joints are part set up it will dry or suck the water out of your grout bag jointing mortar quite quickly about 10 - 20 minutes it will be ready to finish. Now you have your work all grouted and jointed ( the first pass).
It is time for the second pass and some joints will be finished. With your refractor trowel follow along the joints knock off the little curls of mortar and press into to create an even flow of joint.
The final touch is the third pass which will erase your trowel track from the last pass. This can be done with a soft whisk brush.
Some tips and comments
It is hard to say how long a laps of time between jointing, I will say the time from when you put your stones on, those joints take the longest to set up , next pass is 20 - 30 minutes later and the third pass is 10 -15 minutes later, of course this depends on the heat of the day. By brushing the joints we mean when the mortar starts to set up they gout in the holes and when it is set up to the consistency of say moist fudge, brush off the excess with a whisk broom and Done.
The use of muriatic acid, only after several days curing time has gone by, we do not recommend it because it eats the mortar out over the years if not flushed with water properly. If you have to use it because of an accidental mess. Wet down your area, I mean soak it good with a water hose, mix your muriatic acid 10- 20% acid the rest water, with steel brush scrub the area and flush with full blast of a water hose start at the top and come down.
Your best bet is keep you stone clean and be careful not to get splatters on the stone and you won't have to use muriatic acid.
How much to budget for a new home.
To be able to give an exact price for the stone work, final blue prints need to be available, also one needs to consider distance and location and the amount of square footage and the interruptions created by the tedious installation around obstacles.
Usually, one of the last projects of a new home is the stone work and sometimes the least consideration and under budget for. But it is the most focal point when you drive in to a new home or walk into the great room and wow what a river rock fireplace or entrance. So this is no place to be taken lightly.